Saturday, March 21, 2009

Grow Lettuce in Water using simplified hydroponics

Grow Lettuce in Water using simplified hydroponics by Pritham 'metal farmer' D'Souza


in my earlier posts i have showed in detail how to grow lettuce in floating bed. i had showed the procedure in making a float bed, with all imputs necessary like thermocol sheet, black plastic sheet, dishwasher sponge etc with transplanting technique.

now i plan to show the growth stages of lettuce in a step by step pictoral guide from seedling tray/tub stage to harvest stage.

i had first managed to transplant the young lettuce seedlings in grow bed which had coconut peat and rice husk as substrate as shown above.

transplanting was done when the seedlings were about 6 cm in height.

notice the roots on the day of transplanting. the photos were taken on march 3 2009.

in just a weeks time, there was rapid growth as seen above. the pic was taken on march 11, 2009


notice the height of the plant when i transplanted it from seed tray to grow bed. it was approx 6 cm.

the photo above shows me holding the same plant after it was transplanted in the float bed, just 15 days later. its height now is nearly 18 cm.
also look below and see how long the roots have grown.


the above 2 pics were clicked on 21 march 2009, 10 days later. they seem to have grown a lot more & also very healthy and green.

  • remember to continuously aerate the float beds for min 2 minutes daily. i aerate it twice daily.
  • lift the thermocol sheet and spalsh the water with your hand till bubbles are formed
  • bubbles formed in aeration provide atmospheric oxygen to the roots & also destroy any insect eggs, if found.
my only concern is the lettuce though looking very healthy seems to droop & not stand upright. feedback related to this problem is appreciated.

all photos and data by pritham dsouza. to view photos in original size, click on photo to enlarge

Grow Tomatoes on your roof top without soil using simplified hydroponics

Grow Tomatoes on your roof top without soil using simplified hydroponics by Pritham 'metal farmer' D'Souza

Tomatoes are the most widely consumed vegetable in India, where it is used in a variety of cuisines. it is also very popular as puree, sauces & ketchups. however it has always been very challenging to grow tomatoes in the coastal belt as soil becomes the most important factor.
it grows well in black soils not in the coastal red soils.

since hydroponics doesnt need soil, half the battle is already won. following is how i have grown tomatoes without soil, successfully.


in the field, tomatoes are soaked in water or curds for a few days and when the seeds start to sprout, they are braodcast in raised seed beds.
the above pic shows germination just 4 days after sowing. photo taken on feb 5 2009


the above 2 pics show 99 percent germination. even i didnt expect such an amazing and excellent germination percentage. photo taken on 9 feb 2009.

even though it has reached transplanting stage, i decided to wait for some more days to see if over crowding the plants will have any detrimental effect. the only problem i had was the occurence plant hoppers which ended up spreading mosaic virus. i managed to control the problem with neem sprays daily till i didnt see any further spread.

a close up of a tomato plant with distinct leaf structure. bothe the above photos were taken on 25 feb 2009.

after 1 week on march 1 2009, i decided to transplant tomatoes in sepatate growers.

since the grow bed was wider and deeper, i decided to utilize every space available to me. so i transplanted 3 plants together in the same grower as seen above. tomato has fibrous root system, so the roots will produce a number of lateral roots & spread like a very thick network in the grower.

immediately after transplanting i supplied nutrient water till the substrate was saturated and excess water started draining as seen below

transplanting was done on 1st march 2009


20 days later, the growth has to be seen to be believed. the above pic taken on march 21, 2009.

tomato successfully grown without soil.

all photos and data by pritham dsouza. to view photo in original size, click on photo to enlarge

grow orka ladies finger in flower pots without soil using simplified hydroponics

grow orka ladies finger in flower pots without soil using simplified hydroponics by Pritham 'metal farmer' D'Souza


the above photo shows okra plants and cowpea plants grown together in the same grow tub. i have exceeded the normal time for usual transplanting in case of okra. in the field, okra plants are transplanted when 3 leaf stage is seen, wneh the plant attains a min height of about 6 inches.
here i have gone against the norm & transplanted when the plants are over 10 inches long.

an individual plant gently scooped up after light watering of the tub to loosen the substrate.


the above 3 pics shows the thick root network of the plant.

i also transplanted the plants in the afternoon when the intensity of sunlight is maximum. the substrate was well drenched with nutrient water till it reaches saturation point.

the drooping leaves was because of the intense heat. it did not kill the plants, but i had to not provide partial shade if i wanted the plants to improve which i did in the photo below. the plants were transplanted on march 4, 2009


the above photo shows how the plants have started to grow and look a lot more healthier after providing shade net. the above photo was taken on march 13 2009.


okra has grown successfully in flower pots without soil.

all photos and data by pritham dsouza. to view photo in original size, click on photo to enlarge

Grow Ladies Finger Okra without soil using simplified hydroponics

Grow Ladies Finger Okra without soil using simplified hydroponics by Pritham 'metal farmer' D'Souza

Okra (Abelmoschus esculentus) popularly known as bhendi kai in kannada or bhendi in hindi is an annual vegetable crop. one of the most nutrient rich vegetables, the high iodine content in the fruit is used to control goitre, while leaves are used as anti inflamatory & dysentery. the dry seed contains excellent amount of edible oils & proteins, and it is extensively used in cosmetic industries & soap industries. the crushed seed is given to cattle to increase milk production


the above photo taken on feb 25, 2009 shows okra plants grown together with cowpea. germination was observed in 4 days time. in the field, the seed takes a lot of time to germinate as seeds show high degree of dormancy and generally takes up to 7 days to germinate.


a clear photo of okra seedling


the above 2 pics show me slowly lifting the plant ready to transplant in tomato boxes i converted as grow beds. one has to be careful not to damage the roots as they can snap easily. light watering must be done first, and the substrate loosened. then the plant has to be scooped up with the substrate around it intact.

a close up of the roots, well defined & good network

immediately after transplanting, nutrient water must be added till it starts to drain out
the transplanting pics were taken on march 1, 2009

the above photo shows great shoot and leaf development. notice at the growing inter nodes of the plants, flower buds have started to develop
photo was taken on march 13, 2009 just 12 days after transplanting.

the above photo was clicked at night, hence the slight drooping of leaves in the absence of light.

here bhendi is successfully grown without soil.

all photos and data by pritham dsouza. to view photos in original size, click on photo to enlarge

successful growth of indian spinach without soil

Indian spinach(basella alba, basale soppu, valchi bhajji) grown without soil on roof top using simplified hydroponics by Pritham 'metal farmer' D'Souza

in continuation of my earlier post on indian spinach, i am continuing the series of growth events below chronologically


the photo above was taken on taken on feb 11, 2009 the day i first transplanted basale soppu or indian spinach.


the above 4 photos show the development of shoots slowly appearing from the buds.

the above photo taken 14 days after transplanting clearly shows the appearance of new shoots & branching. photo taken on feb 25, 2009

the fading of green was my mistake as i had initially given light dose of nutrients. once i gave nutrients in full strength, visible lush green appearance was seen in 2 days time as seen below.
the above 2 photos show the shoot and lateral branching and excellent growth of indian spinach.

photo taken on march 13th 2009.

all photos and data by Pritham Dsouza. to view photo in original size, click on photo to enlarge

Grow harive soppu amaranthus without soil

Grow Amaranthus harive soppu on your roof top without soil using simplified hydroponics by Pritham 'metal farmer' D'Souza

amaranthus or harive soppu as its popularly known as in Kannada is a leafy vegetable grown for its excellent taste and high nutrition. its also a very profitable as the crop can be harvested within 21 days, thus fetching better returns in a shorter time.

i have grown the crop first in tubs with coconut peat and rice husk substrate, & later i have grown it in floating beds.

i used a spoonful of seeds in a single grow tub. i spread the seeds evenly on the surface & watered it using my own mixture of sea weed based algae gel for the first few days till it germinated and later for a few more days till it was big enough. then i switched on to the nutrients provided by CV.

the photo above shows germination in progress just 2 days after sowing. in the field, germination can be noticed after 4 days. the above photo was taken on Jan 31 2009
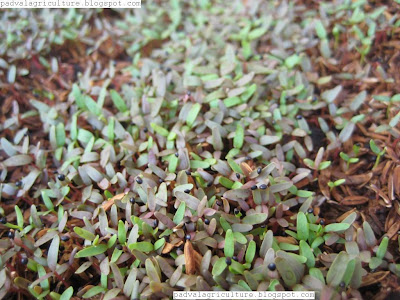


the above 3 photos were taken on Feb 2, 2009. notice nearly every seed i sowed, has germinated perfectly.
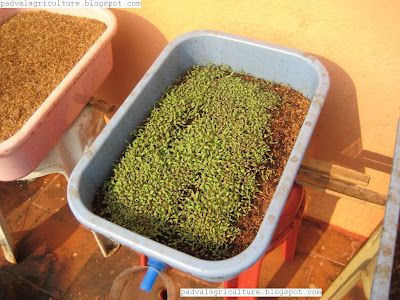
amaranthus loves sunlight. so the tub was placed such that it receives max sunlight for most part of the day as seen above

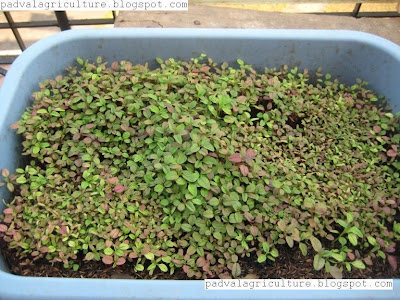
the above photo was clicked on feb 9, 2009. notice in detail, the black smudge was due to the algae gel i used for the first 10 days of plant growth. later when i switched over to the nutrients provided by CV, the leaves appeared much greener & distinct, without the black spots
harvesting in amaranthus is generally done within 21 days after sowing, but there is not rule here. some people keep the plant for as long as 45 days as seen below, till the leaves become very large & stem hardens a bit. for some people , harvesting is preferred when the plant is very tender, just 6 to 8 inches in height.
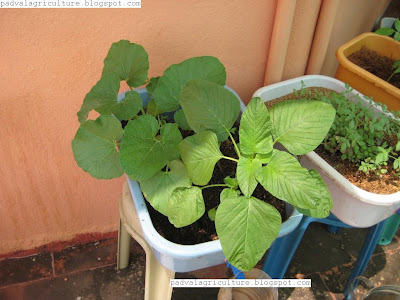
the photo above shows individual amaranthus plant grown in same tub as bottle gourd. the plant can either be cut at the stem level a few inches above the ground level or whole plant is uprooted & bundles are made and sold.

Amaranthus in Floating Bed by Pritham 'metal farmer' D'Souza

i wanted to experiment with amaranthus just like in lettuce, if it works in floating bed. for this i used a regular dish washing sponge and made a deep cut in the middle as shown below.

since the plant is very thin, i took 10 to 15 plants together as seen below


then i placed them in between the deep cut i made on the sponge as seen below and placed them in the thermocol sheet which had holes made previously to accomodate the plants.
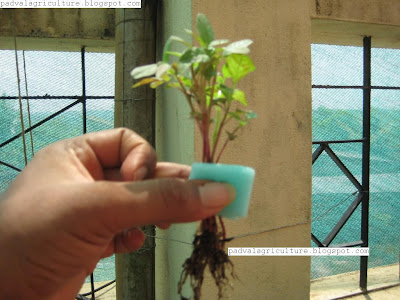

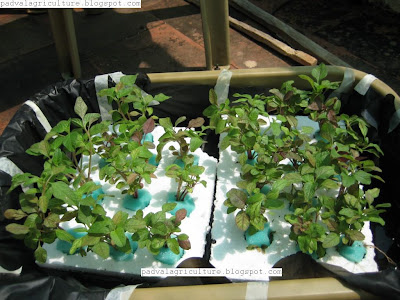
the above photos were taken on march 12, 2009.

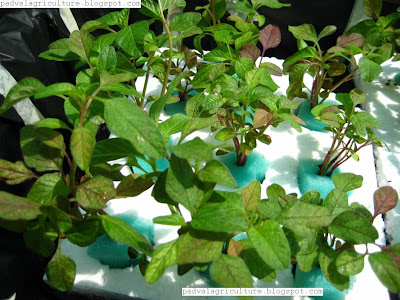

the above 3 pics were taken on march 21, 2009. the growth is a bit slower, but if one notices, the leaves have turned a lot greener than they were on the first day of transplanting.

advantages of floating beds
  • portable beds, can be taken anywhere
  • since the water has nutrients, no need to add more nutrients unless deficiency is observed
  • since there is no soil, no question of soil borne pathogens or pests.
Most important poinf for float beds
  • daily aeration is a must as the roots need to get as much oxygen as possible. this can be done by splashing the water and creating bubbles as seen in the pic below

  • this splashing of water creating air bubbles destroys any kind of insect eggs like mosquito eggs if any, in addition to providing oxygen to the roots.
  • minimum 2 minutes of splashing waterdaily has to be done, i splash water twice daily for better aeration.
All photos and data by pritham dsouza. to view photos in original size, click on photo to enlarge